Thursday, July 7, 2011

Dat Solar Cooker


In A quest to lower our carbon imprint on society and also for times where just plain camp cooking is involved The DAT solar cooker makes an excellent folding portable addition to any kit.
They are really easy to make as you can see in the video. For me I found it easier to make them using a skill saw. Each Cooker takes twelve pieces of cardboard covered with aluminum foil or a highly reflective Mylar.
glue one side of each piece of cardboard and let dry place the pieces together with a sacrificial piece of cardboard on top and bottom. Mark out the pieces according to the plans available at
http://solarcooking.wikia.com/wiki/Category:Solar_cooker_plans


Now Clamp the pieces together mark out the pattern as shown.
 Drill the two holes on the ears at the back and cut them out.

align the pieces together and tape along the long edge.
forming a ring
Join the pieces together with a piece of string inserted through the holes that you drilled.

Take a stick and twist taking up the slack forming a barabolic shape to the back of the cooker

This will show how the outside of the back should look once you have gotten this far.
Here is the interior of the cooker so far.. Now you need to put sticks through to make the shelf to support the cooking pot.
This shows the placement and construction of the pot shelf. you will need to cut or drill holes to your cooker to put through the unit.
A stand can be fashioned out of wood or cardboard to hold the cooker at the right angles..
This is a simple and easy to build solar cooker. You never know when one will be needed. This unit can be folded down to be easily carried with you. In another blog I will show you how to make a flat foldable solar cooker that is only one piece of cardboard covered with tin foil. I hope you enjoy this project and build one soon. This makes a suitable youth group project. The same unit can also be used as a solar hot water collector although a trough model is easier and more efficient to build ..
A simple one pot cooking recipe for this cooker is

Imitation ham bean soup.
1/2 cup of Ham TVP ( soaked)
1 Tbsp. of smokey ham soup base.
3/4 cup of White beans ( pre soaked overnight)
1 Carrot diced
1 potato cubed.
1/4cup diced onion bits
1/4 cup celery bits
Place the beans and ham flavoring in the pan with two quarts of water. Let simmer on the stand for two hours. Then add the tvp ,Carrots and potato, Celery and diced onion bits Let cook another two hours on solar cooker. Once cooked this makes a great imitation Ham bean soup out of your food stock enjoy.. You can also make dumplings to drop in at the same time the last ingredients are put in. depending on how strong the sun is will depend on cooking time.

Monday, July 4, 2011

Pop bottle Water Filter.


sometimes you must know how to do with what is on hand. If you don't have a chance to add a lifesaver water bottle to your 72 hour kit ( it can be purchased at Amazon.com ) (http://www.amazon.com/Lifesaver-Bottle-4000-Ultra-Filtration/dp/B001EHF99A/ref=sr_1_1?ie=UTF8&s=sporting-goods&qid=1309808137&sr=1-1)

http://www.ted.com/talks/view/lang/eng//id/613

Then to make one you take out a sharp object hopefully you have a multi tool in your kit. on most multi tools there is an awl this is used to poke a hole in the top of the cap then cut the bottom of the bottle out.
take a wedge of cloth and put that in the cap. Now turning the bottle upside
alternate each level. If you can use a piece of cloth between each level or cotton
1 Activated Charcoal. This may not be readily available.If you have access to an old can pop or beer can you can make your own charcoal by putting pieces of wood in it and placing the can in the fire pit.
2 coarse Sand and Fine sand separated.
3 Coarse Gravel and fine Gravel separated
4. Cotton or Cloth you can get by with pebbles


Saturday, July 2, 2011

Food Storage.

When starting your food storage always remember.. Baby Steps.. Don't try to rush into making a food storage plan. Start out with just buying a few extra cans every time you shop. or if there is a good sale item to buy that.
Like recently butter was at a super price so I canned butter for our winters supply. Just the thing. Now with  dehydrated foods. People get discouraged with re-hydrating them for me I find with items like textured vegetable protein or potato's ( not the mashed but diced and sliced and has browns) it works great to take a container for me it is a pint container that I fill half full of the dehydrated then top the container with water.I do this the day before I want to cook them up. when you do this you won't be able to tell the difference from them and the freshly sliced potato's.
With beans you first have to start them to boil let them simmer for approximately fifteen minutes then set aside in the fridge overnight. the other way to do it is let the soup simmer for about two hours to get them re hydrated.
Always remember that they isn't any set food plan each individual has their own  tastes and food favorites stock up accordingly to your own tastes.
Canned meat is always fun. I will have a post later on when I start my winter hamburger and roast canning.

Here are a few sites that are wonderful places to start on your journey to self preparedness.Our house hold has bought-en stuff from each place and use them regularly in our daily living.
http://beprepared.com/
http://www.earthwaveliving.com/
http://www.harmonyhousefoods.com/ 
http://www.areyouprepared.com/
https://www.usaemergencysupply.com/

Cheap easy Water Filter


People caught in a disaster situation always need clean ( bacteria free) water. One of the first things that goes  are the things we seem to take the most granted for. Waste removal and clean drinking water. If a person took a good look at the recent devastation in japan or the droughts in other continents the need for every household to have such a system is obvious.
To make a cheap drinking water system is easy and relatively cheap.
Everyone that we know knows that we suggest everyone to have at least a three week supply of food and other basic needs. Just in case of a devastating blizzard or storm and we should always have enough drinking water to last at least three days.
The Texas Baptists Water ministry has for a long time suggested just such a thing they travel to war torn or environmentally devastated area's and see the need first hand.
They publish ans suggest everyone to build just such a system for each home.
The assembly is easy.
First you need to acquire the materials.
1. a ceramic half micron water filter. ( these can be gotten from almost any hardware store or ordered online)
2. a vinyl spigot for the side of  the bottom bucket.
3. 2 containers. ( five gallon buckets or blue fifty five gallon barrels etc. will do any two like size containers will do)

Assembly.
1. Drill a whole to accommodate the filter in the center of the top bucket.

2. Wash off the ceramic filter without touching the filter. then place nylon washer on the post and put it in the whole screwing the wing nut on the filter post.

Now that the filter is on you can drill the side  of the bottom bucket. and put the spigot in placing the nylon washer on it and putting it through the side.
Now that this is done you can put the lid on the bottom bucket with the drilled center hole in it place the top bucket on top of the bottom and fill with water.
The importance of having a clean water filter can't be said enough. With the crazy weather changes we never know when good clean drinking water will be needed.
A decent stand for this unit can also be gotten at any hardware or lawn care store in the way of a corner plant stand of course any table will do.
In the future I will show you how to make a simple pocket solar still in case you are stranded  in your car or to just carry in your camping great. another good thing to keep on hand is a small bottle and eye dropper. both can be gotten at any pharmacy. put bleach in this and keep in your day pack and seventy two hour kit.
Here is the calculations of bleach to water to purify it to drinking.
Always remember it is better if you can boil the water first but this works in a pinch.
2 drops of chlorine bleach to quart of water
8 drops of bleach to a gallon of water
1/2 teaspoon of bleach to five gallons of water
And be sure to remember if the water is cloudy double the bleach

Friday, July 1, 2011

72 hour kit.

We never can tell when an emergency will come up that will require the need to move out be it a tornado or a hurricane , a flood the list is endless. I personally recomend that everyone have a small backpack or bucket that can hold what we would need to carry out with us in a hurry.
A one gallon Milk Jug will do good for a fast easy kit.

72 Hour Kit Instructions

Step 1 – Make sure you have saved 1 milk jug and 3 2-liter bottles per person. Wash them all out with soap and let dry.
Step 2 – Multiply the number of kits you want by the items listed at the bottom of the page and purchase the food items from Walmart or your neighborhood grocery store. All the food will cost around $8-10.
Step 3 – Purchase a wing stove and fuel pellets from an emergency preparedness store such as Emergency Essentials or if one isn’t available in your area follow the links below to order online. Only one stove is NECESSARY per family, but they are pretty cheap so if you’d like to have one per kit that is fine too. It will make it much more convenient in a true emergency. In another post I will be showing you how to make a small gel alcohol stove out of two used soda can's and will also be showing you how to make a fordable solar cooker out of cardboard and aluminum foil.
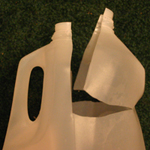
Step 4 – Cut straight down the middle of a milk jug diagonal from the handle. Go about 1/3 of the way down. At the bottom of that cut, make a horizontal slice coming from each side but leave about 2 inches of the jug intact. This should make a sort hatch that you can pull open and insert the items in. Watch our video below if you are having trouble visualizing how to do this.
Step 5 – Place the necessary items into each milk jug according to the list. Put the Tang and cocoa servings into small zip-lock bags or purchase the drinks in the individual packages (1/4 c. per serving). If you have extra food left over, stick it in as space permits. Tape the milk jug up. Tape the contents list to the outside of the jug and record today’s date and the family member who will use that kit. VOILA!
Step 6 – Fill your 2 liter bottles with water and store all of the items in an easily accessible place (your car trunk is the ideal place if you have room)
The list for a simple seventy two hour kit is.
2 servings of tang or other fruit drink. sugar free cool aide in one oz containers
2 packets of Instant oat meal
2 granola bars
2 packets of instant cocoa
1 packet of libbeys pasta meal
1 pack of ten sticks gum
10 pieces of Jolly Rancher candy or any other hard candy
1 can Vienna sausage another mead would work to such as a foil packed tuna or a can of corned beef or spam
3 fruit rollups
1 can of pasta meal ready to eat.
1 oz box of raisins
1 foil packed stick of beef Jerky
1 space blanket
4 1 liter bottles of water
24 squares of toilet paper
Camping spoon and fork. ( Walmart and any ace hardware will have them in the camping section comes as a pocket knife with a fork on one side a spoon on the other a knife blade and can opener saw inside)
Matches and water proof match container on top of the matches in the container put a small wad of toilet paper)
Magnesium fire starter and steel
Wing stove and fuel pellets.
In another post I will show you how to take two old used pop cans and make a wonderful jell alcohol cook stove in another one I will show you how to  make a hobo stove ( small rocket wood gas stove)


1 blue tarp 
1 small roll of parachute cord.
around the milk jug or gallon can fold and wrap the blue tarp around it as an emergency shelter then quick knot tie and loop the para-cord around the can and tie it off.
for a more complete kit you can use a five gallon bucket with a lid along with the gallon jugs or can's an unused paint can can be gotten at almost any hardware store along with small back packs etc. 

Easy Toffee Pie

Another great Recipe is one of my favorites. This one you can use just graham crackers a little butter or oil. sugar and condensed milk.

One can of sweetened condensed milk
one cup of crushed peanuts
one cup of graham cracker crumbs
3/4 stick of butter
1/2 cup brown sugar
Whipped Topping 
( If whipped cream is unavailable then use your storage whipped topping Dream Whip Is a wonderful treat)
To start take your graham crackers and began crushing them in a plastic bag or buy graham cracker crumbs already made.
I am thinking about what you would have to use from your food reserves. 
Mix it with the brown sugar and oil (3Oz) or butter.
Press it in the bottom of your pie tin. 
Put this in the oven for at 350 degrees for approximately 15 minutes. just to toast the pie crust a little bit.
After you do that  set it aside once it cools put ice cream in the bottom of the pie pan and place in freezer.
Take your can of sweetened condensed milk put it in a pan of water make sure the water covers it about an inch and put it on the stove to boil. after it starts to boil turn it down to a simmer and cover. Make sure you keep the water over the top of the can simmer this for approximately 3 hours. After it has simmered set aside to cool.
Now that you are ready to add the toffee open your can of sweetened condensed milk and scoop the toffee on top of the ice cream layering it with peanuts and toffee. make sure you sprinkle the last of the nuts on top. cover with whipped topping and you have a very nice desert all using long term storage items. 
With this pie you can substitute a variety of fresh or canned fruits instead of peanuts. 
For dehydrated fruit to get a nice fruit pie filling make sure you make a light syrup by placing your dehydrated fruit sprinkle sugar fruit.. to the half way mark of your container. ( I like to use a pint freezer container) then fill with water and let hydrate.

Home made Ice Cream Substitute.

Happy Fourth of July everyone. Well we all know that the fourth of july celebrations just aren't the same without having home made ice cream. There are two ways you can make home made ice cream. you can make it with Cream and milk.. Or if times are hard and you are living off of your food reserves then you can make one of my favorites.
Milk Substitute Vanilla Ice Cream

Coffee whitener 2 litres (2 US quarts)
Instant skim-milk powder 350 ml (1.5 cups)
Sugar 500 ml (2 cups)
Gelatin one 7 g (1/4 oz.) pkg.
Egg one med or large
Vanilla 10 ml (2 teaspoons)


Here is the recipe for regular Vanilla Ice cream.


Regular Vanilla Ice Cream

Table cream 2 litres (2 US quarts)
Instant skim-milk powder 350 ml (1.5 cups)
Sugar 450 ml (2 cups)
Gelatin one 7 g (1/4 oz.) pkg. 
Egg one med or large
Vanilla 10 ml (2 teaspoons)


Once you have the ice cream mixed  put it in your hand cranked ice cream machine and put your ice chips around sprinkle with rock salt and crank. 
The usual time will depend on how long you crank and  how much ice if it stays soft then add more ice and salt to the outside of the mixer. Good luck and have a wonderful fourth of july.